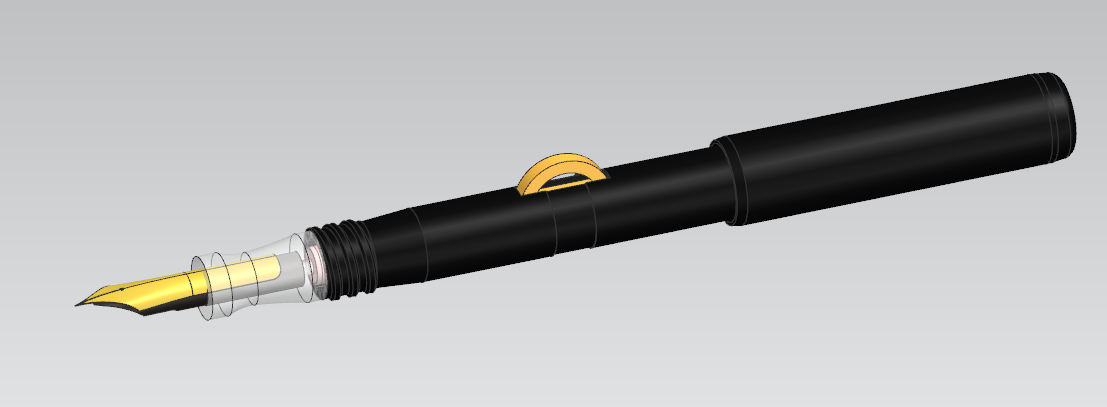
I tried just about every suggestion here, but still couldn’t get an airtight print. This is transparent PLA. I’m going to play with my speeds and overlap to try to get it clearer, but it was dimensionally accurate and completely sealed the first try.
Don’t look too carefully at the barrel, it’s just a hollow test one. I was able to eyedropper fill and test the grip section with it, but the OD is wrong, and there’s no real filling mechanism in it. That’s phase 2 of this project!
Looks good. I’m glad it worked. I need to try clear PLA too, that’s new to me.
You can also sand and polish any filament with decent results. The only issue with PLA is usually related to temperature, if you are using power tools, and only if you push too hard when looking to achieve an accurate finish with a specific grit.
I use a similar sanding and polishing regime as I would with auto body clear coats, except I improvise for household junk instead of buying proper polishing compound. I owned a body shop for most of my 20’s. If you have any questions feel free to ask.
I’ll definitely try that out. I have quite a bit of experience making plastic shiny, I like to work on vintage pens. Probably sand it from 320 to 6000, the switch to Novus 3 through 1. It will probably feel more quality than the thick layers I’ve been doing with my 0.6 nozzle.
If you’re looking for watertightness and optical clarity, have you considered looking at Taulman T-glase? One of it’s advertised features is that it has very little thermal shrinkage and can be tuned to be watertight for FDA approved food purposes. It’s PETT not PETG but that’s not too different from PETG IIRC. I’ve personally been looking to get a hold of some for my own 3d printed fountain pen experiments
Also there’s a chance it might be an issue with the sliced model itself, not your filament settings. Cura can do some funky things sometimes with holes
I’m going to try the PLA a bit more, before I go ordering any more clear filament I think. Thanks for the suggestion though! If you end up getting some and it turns out well, maybe you’ll persuade me. What kind of fountain pen things are you trying to print?
I’ve actually been trying to figure out if I could print out an entire pen, sans the nib and feed (and convertor - I want to make something that’s accessible, not something that’ll drive people mad trying to make it fully watertight or that’ll get me sued by TWSBI lol). I’m pretty confident in my TPU skills for gaskets and this is also a project to test out how robust my CAD skills are, because I want to make something that other people can alter. Like want a pen with an unusual grip for accessibility reasons? Or want to make your own knockoff Additive Pens with resin? Or just want to muck around with designs? Go ahead!
…also ngl this is kinda fuelled by how bloody fugly every kit pen I’ve seen is
We have similar goals. I am not so concerned with having it modifiable, I’m working in NX and am not going to be making .prt files available. This pen is for me, and if others like it, so be it.
But making it almost entirely printed is also my goal. I’m using a Jinhao #6 feed, and a Fountain Pen Revolution #6 nib. No saying you couldn’t use a JoWo, or a Jinhao, or a Bock #6 nib, though. I thought about cartridge converters, but thought it might be too difficult to print the connection interface. The Pilot Con-B squeeze converter could be a good option though, I think that has a bigger hole. I’m going with a latex sac because it seemed easiest to me.
I, also, hate pen kits. The all look identical, with their skinny little grip sections and tiny nibs blown out to a huge body. The nibs are always cheap, and the pens are always heavy.
What software are you using?
I’m just using good ol’ fusion 360. I’ve tried learning like openCAD but tbh I’m not the biggest fan of it. I haven’t really thought about the cart connection interface because I’ve been using schmidt nib units (just because I have a few lying around) and the interface is built into the unit itself and like, why reinvent the wheel? I’m more aiming to design a pen body rather than simply make a 3d printed pen just because I can
Fusion 360 looks like it has some nice surfacing abilities. That makes sense to use nib units. I don’t think my Adventurer 3 can print the small, fine threads of a nib unit, so I’m opting for an old school grip section you friction fit the feed and nib into.
I’ve been working on my model this week and instead of the stud filler, I am going for a Conklin style crescent filler. Just one more piece to design, and I’m ready to do some test prints. Ink sacs are in the mail.


You should post on the fountain pens community on the wayfarers haven instance! I’m sure folks there would love to see this, and even more so once you get a result you’re happy with!
Wow, I swear I searched for fountain pen communities when I got on Lemmy but I must have only been searching locally. Thank you! I will certainly post it when it’s done.
I’ll give you a sneak peek at what I think the filling system will be. I thought I was going to make it a lever filler, but this is even easier.
This is a Jaxon Self-Filling #4, very similar to a Conklin Crescent Filler. Actually, I believe Jaxon was a Conklin subsidiary. It’s just a button connected to a big bar that squishes the sac, and a rotating slotted ring keeps you from accidentally pushing the button.

That looks cool as hell! How funky


